Assignment 8: Blending in
In which, we implement blending and reorienting between motions
Due Friday, Nov 12, before midnight
The goals of this lab are to
-
Implement spliced motions
-
Implement blends between similar motions
-
Modify animations for a part of the body
-
Align motion sequences for blending
Get the source
On Github, do a Fetch Upstream to synchronize your forked repository with the class repository.
Then update the source on your local machine and rebuild.
> git pull
> cd build
> cmake ..; make
1. Blend
In this question, you will blend the walk motion with a strafe motion. Implement your solution in <b>assignments/a8-blend/ABlend.cpp</b> inside of the method <b>blend()</b>.
// m1: First input motion
// m2: Second input motion
// alpha: blend value
// returns the result of m1 * (1-alpha) + m2
Motion blend(const Motion& m1, const Motion& m2, double alpha)
This function should implement the algorithm from class
duration = duration1 * (1-alpha) + duration2 * alpha
deltaT = 1/fps
for t from 0 to duration, increment by deltaT
    Pose pose1 = pose from motion1
    Pose pose2 = pose from motion2
		Pose newPose = lerp pose1 and pose2 by alpha
		result.appendKey(newPose)
return result
To run the demo from the build directory, type
build> ../bin/a8-blend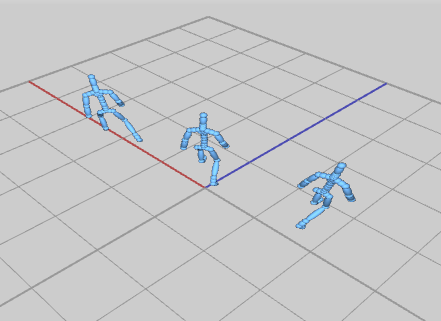
Controls
-
Press 'UP' to increase the blend factor _alpha
-
Press 'DOWN' to decrease the blend factor
Your program should have the following features
-
blend()should create and return a new motion. UseMotion::appendKeyto add poses to your blended motion -
The motion returned by blend should have a framerate equal to motion1. Hint: Call setFramerate() before returning result.
-
The duration of the blended motion should be based on the blend factor, e.g. duration = duration1 * (1-alpha) + duration2 * alpha.
-
Use
Pose::Lerpto blend poses from motion1 and motion2
2. Splice
In the file splice.cpp, implement a character that walk and dance gangnam style at the same time.
// orig: Starting input motion
// upper: Motion for the modifying the upper body (all joints which are descendants of the spine)
// alpha: blend value
// returns a new motion such that
//     the lower body matches the motion in 'orig'
//     the upper body is the result of blending the upper body motion with
//         the original's upper body motion, e.g. newupper = upper * (1-alpha) + orig * alpha
Motion spliceUpperBody(const Motion& orig, const Motion& upper, double alpha)
For this question, use keys for blending instead of durations, e.g.
for i in range numKeys in orig
    Pose pose = orig.getKey(i)
		// compute new pose and either call appendKey() or editKey() set the pose
    // editPose() replaces an existing key; appendPose() adds the key to the end of the motion
To run the demo from the build directory, type
build> ../bin/a8-splice
Controls
-
Press 'UP' to increase the blend factor _alpha
-
Press 'DOWN' to decrease the blend factor
Your program should have the following features
-
spliceUpperBody()should create and return a new motion. Use AMotion::appendKey to add poses to your blended motion -
The motion returned by blend should have a framerate equal to orig
-
The upper body consists of all descendants of the joint "Beta:Spine1"
-
Use
glm::slerpto blend local rotations for the upper body -
In the above demo, we use start splicing the poses of the upper body starting at key = 120
3. Zombie Arms
In the file, zombie.cpp, implement a character that walks with zombie arms.
Your implementation should load the motion, walk.bvh, and modify the arm motion to
create this effect. We will implement and compare two techniques for modifying the arms: "Freeze" and "Offset".
To run the demo from the build directory, type
build> ../bin/a8-zombieControls
-
Press '0' to see the original motion
-
Press '1' to see the arms with a constant rotation
-
Press '2' to see the arms with an offset rotation
3.1. Freeze
To freeze the arms, we will set both the shoulders and elbows to a constant
rotation. Implement your solution in the function computeArmFreeze.
// motion: input motion
// returns a new motion with the shoulders and elbows outstretched
Motion computeArmFreeze(const Motion& motion)Freeze arms should have the following features:
-
The left shoulder should local rotation equal to XYZ euler angles (-53, -88, -33)
-
The right shoulder should local rotation equal to XYZ euler angles (14, 88, -33)
-
Both elbows should local rotation equal to XYZ euler angles (0, 23, 0)
-
The motion returned should have a framerate equal to motion
-
You should modify the joints with names: "Beta:LeftArm", "Beta:RightArm" (shoulders), "Beta:LeftForeArm", and "Beta:RightForeArm" (elbows).
3.2. Offset
To offset the arms, we will apply an offset rotation to shoulder’s animation
curve. We will freeze the elbows as before.
Implement your solution in the function computeArmOffset.
// motion: input motion
// returns a new motion with the shoulders and elbows outstretched but moving
Motion computeArmOffset(const Motion& motion)
To compute the offset, we will use the local rotation of the should on the first frame to compute an offset rotation.
where \(R_i^j\) is the local to parent rotation for the shoulder joint. \(R_{desired}\) is the target rotation we want for the joint. For the right joint, the desired rotation will be the XYZ euler angles (14, 88, -33). For the left joint, the desired rotation will be the XYZ euler angles (-53, -88, -33). Be mindful that these angles are in degrees, not radians!
Offset arms should have the following features:
-
The left shoulder’s desired rotation is XYZ euler angles (-53, -88, -33)
-
The right shoulder’s desired rotation is XYZ euler angles (14, 88, -33)
-
Both elbows should local rotation equal to XYZ euler angles (0, 23, 0). These frozen as before.
-
The motion returned should have a framerate equal to motion
-
You should modify the joints with names: "Beta:LeftArm", "Beta:RightArm" (shoulders), "Beta:LeftForeArm", and "Beta:RightForeArm" (elbows).
4. Reorient
In the file reorient.cpp, you will modify a motion so it starts in a new location
and orientation. You will need to perform the same calculation in crossfade to
align two motions.
// motion: the input motion
// pos: the new starting position of the motion
// heading: the new starting orientation as an angle (radians) around the world UP axis (e.g. Y)
// returns a new motion whose starting pose has a root position and rotation that matches pos and heading
Motion reorient(const Motion& motion, const vec3& pos, double heading)
To run the demo from the build directory, type
build> ../bin/a8-reorientControls
-
Use the left and right arrow keys to rotate
-
Use WASD to translate forward, back, left, and right
Your demo should have th following features
-
The returned motion should have the same framerate as the input
-
The root position and heading of the first frame should match the desired position and heading. All subsequent frames should be offset so the resulting motions looks like the original.
-
The best solution should only align the headings. However, you may implement a simpler solution which sets the full XYZ orientation to match the heading. This will affect how motions where the root may tilt (such as jumps) are reoriented.
5. Unique
Personalize at least one of the demos from this week. Some ideas:
-
Support additional commands in your controller (such as dance, or jumping)
-
Create a unique character
-
Add a particle trail that emits from your character as it walks around
-
Create an interesting environment for your character to move around in
-
Use blending in your controller
-
Procedurally create a silly walk
In your README, be sure to describe what your customizations.
6. Hand-in your work
6.1. What to hand-in
-
Your code
-
Images, movies, gifs, as appropriate
-
Your readme
6.2. How to hand-in
Check-in your code, images, and writeup and push the changes to Github. If everything is uploaded correctly, you will see your work on Github.
> cd animation-toolkit
> git add <files>
> git commit -m "helpful message"
> git push
Best practice is to always commit changes as you work, rather than waiting until the end to commit changes. You can always revert to an old version if you need to!
Your code should download and compile without modifications. Test your assignment on a lab machine (Park 230) to ensure that it works.
6.3. Generating images, movies and gifs
Screenshots
On Ubuntu, you can take a screenshot by
-
Prt Scrn to take a screenshot of the desktop.
-
Alt + Prt Scrn to take a screenshot of a window.
Gifs
On Ubuntu, you can use Peek to create gifs.
Movies
On Ubuntu, you can use recordmydesktop to record movies in .ogv format.
By default, the whole desktop is recorded unless you give it a window id.
To get the window id, call xwininfo and click on the window. Then pass the
id to recordmydesktop.
> recordmydesktop --windowid <WindowId> --no-sound --v_quality 30 -o <name>.ogvTo check the video, open it in firefox.
> firefox <name>.ogv| Files larger than 100 MB cannot be checked into git. In general, videos should be less than 5 MB. |
6.4. Update your Readme.md
Update assignments/a8-blend/Readme.md to document the features in your assignment. Your readme should contain your images, gifs, and movies.
On github, you can drag and drop movies into your readme files. Images and gifs can also be added that way, or by including text such as the following
This Guide can help you with writing markdown.