Assignment 6: Building character
In which, we take our first steps making our characters step
Due Friday, Oct 29, before midnight
The goals of this lab are to
-
Implement slerp
-
Start working with skeletons
-
Create and animate simple characters
Get the source
On Github, do a Fetch Upstream to synchronize your forked repository with the class repository.
Then update the source on your local machine and rebuild.
> git pull
> cd build
> cmake ..; make
1. Slerp
Implement Quaternion::Slerp() in
libsrc/atkmath/quaternion-basecode.cpp
To run the unit tests from the build directory, type
build> ../bin/a6-test-slerpHere is sample output:
q0 0 0 0 1
q1 0 0 0.866025 0.5
t=0.25: 0 0 0.258819 0.965926
t=0.5: 0 0 0.5 0.866025
t=0.75: 0 0 0.707107 0.707107
t=1: 0 0 0.866025 0.5
To run the class teapot demo from the build directory, type
build> ../bin/a6-slerp-teapot
2. Stacking Boxes
The atk::Transform class represents a 4x4 homogeneous transform as a 2x2 block matrix.
The transform’s rotation \(R_j^i\) and translation \(d_j^i\) are member variables.
Because the bottom row of such matrices are always known, we do not
store them. Instead, we store the top left block as a rotation (Quaternion) and the
top right column as a vector.
For this question, you will use the transform class to position several boxes.
Look at the code in assignments/a6-transform/boxes.cpp.
You will need to modify it.
A room has three boxes in it. Each box has a local coordinate system attached to it. The lengths of all three boxes in the x,y, and z directions of their local coordinate frames are (3,2,1) respectively. The origin of each box is in the lower left-hand corner. The z-axis of each box is aligned with the global Z axis.
-
The position of B1 with respect to the world (e.g. the coordinate system corresponding to \(X_0, Y_0, Z_0 \)) is \(p_1 = (-2, 0, 1)^T \).
-
The position of B2 with respect to the world is \( p_2 = (4, 0, 2)^T \). The rotation of B2 with respect to the world is 45 degrees around the Z axis.
-
The position of B3 with respect to the world is \( p_3 = (5, 4, 2)^T \). The rotation of B3 with respect to the world is 90 degrees around the Z axis.
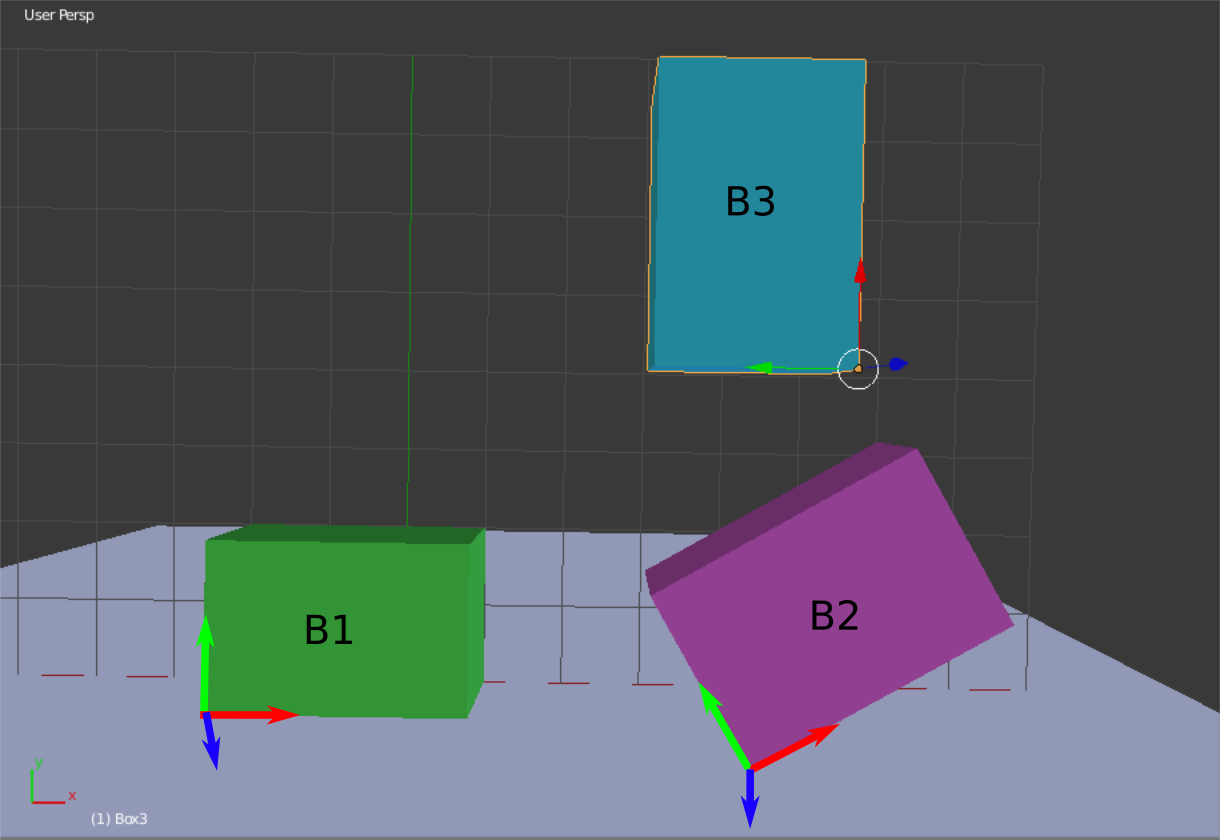
In your lab for this week, you will manually solve for the transforms corresponding to the above picture.
In this part of the assignment, you will implement the solutions in assignments/a6-transform/boxes.cpp.
You have already been given code corresponding the worksheet. You need to fill in values and define additional
transforms.
To run the demo from the build directory, type
build> ../bin/a6-boxesTransforms to implement:
-
Q1: Specify the displacement and rotation that transforms from frame 1 to the world frame.
-
Q2: Specify the displacement and rotation that transforms from frame 2 to the world frame.
-
Q3: Specify the displacement and rotation that transforms from frame 3 to the world frame.
-
Q4: If a transform \( F_j^i \) transforms from frame j to frame i. The inverse \((F_j^i)^{-1} = F_i^j\) transforms from frame i to frame j. Use this fact to compute the transform from frame 2 to frame 1. You implementation should use \( F_1^0 \) and \(F_2^0 \).
-
Q5: Compute the transform from frame 3 to frame 2. You implementation should use \( F_2^0 \) and \(F_3^0 \).
-
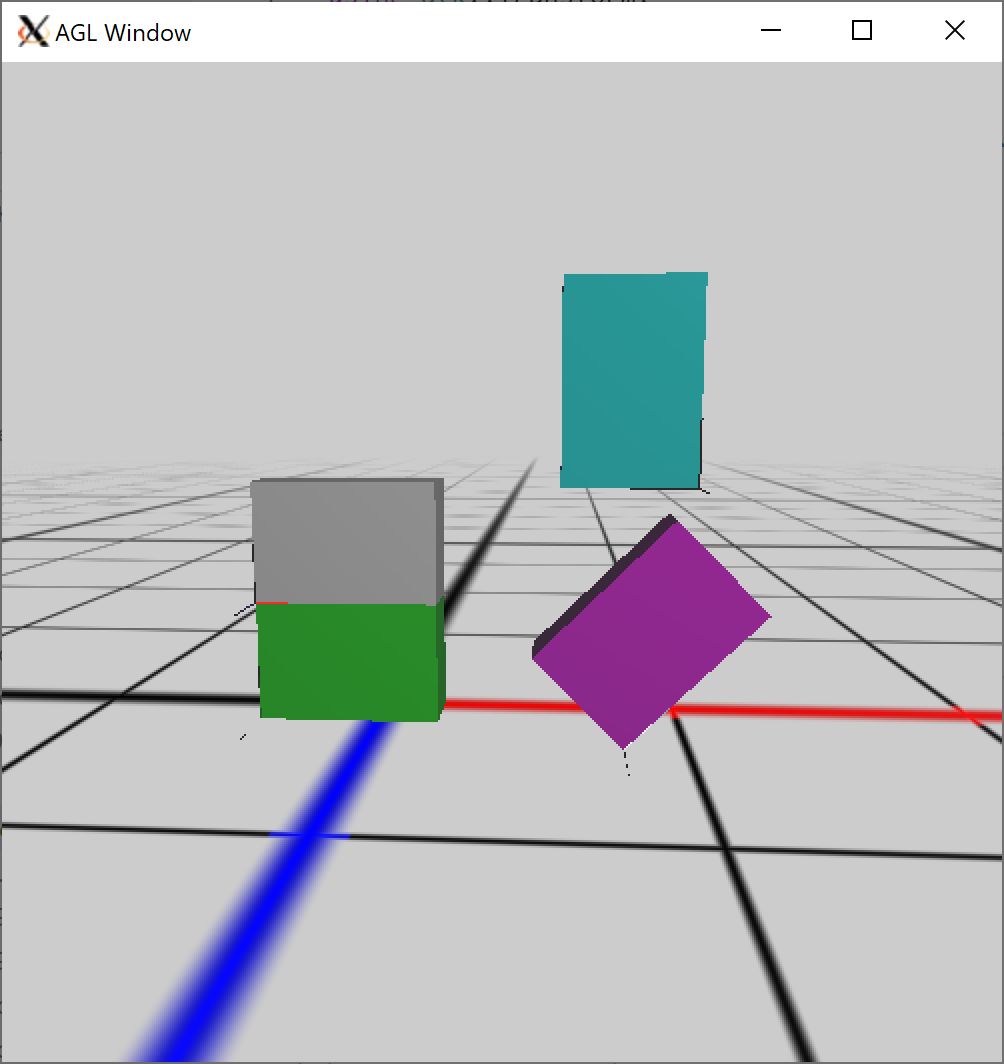
Q6: Transforms can be interpreted as (1) conversions between frames of reference, or (2) modifications on an object. Consider Box 2. Suppose we wish to move it from its current location and orientation so it stacks on top of B1. Compute a series of transformations that achieves this result.
After completing each part, your scene should look like the following:
3. Skeleton
In this question, you will learn about the atk::Skeleton and atk::Joint classes in your basecode.
First, read the header files for Skeleton and Joint in libsrc/atk/skeleton.h and
libsrc/atk/joint.h.
Second, complete the program in assignments/a6-transform/skeleton.cpp
This program loads a BVH file and prints information about the character in it.
For more details, read below.
To run the demo from the build directory, type
build> ../bin/a6-skeletonThe Skeleton class implements a hierarchy of joints using a tree data structure. Using the skeleton class, users can iterate over joints and navigate through the joint hierarchy using depth- or breadth- first searches.
The Joint class stores two transforms: one that converts from the local frame of the joint to its parent (called local2parent);
and one that converts from the local frame to the global frame (called local2global). When a skeleton is created, each joint must be
initialized with its local to parent transform. A joint’s local to global transform is only computed later,
when the user calls Skeleton::fk(). Joints also store an ID, name, parent pointer, and list of children pointers.
The root joint always has an ID of zero and a NULL parent pointer.
This program reads in the skeleton from a BVH file. The channels for each joint represent the degrees of freedom that are animated in the file. Rotations are specified as euler angles, based on the channel order.
After modifying the program, you should see output like this.
4. Tentacle
Forward kinematics (FK) is an algorithm that allows us to efficiently compute the global positions of the end effectors of a character, given the local2parent transforms at each joint. A by-product of this process is that we also get the local2global transforms for every joint in the skeleton, meaning we also get the global positions of every joint.
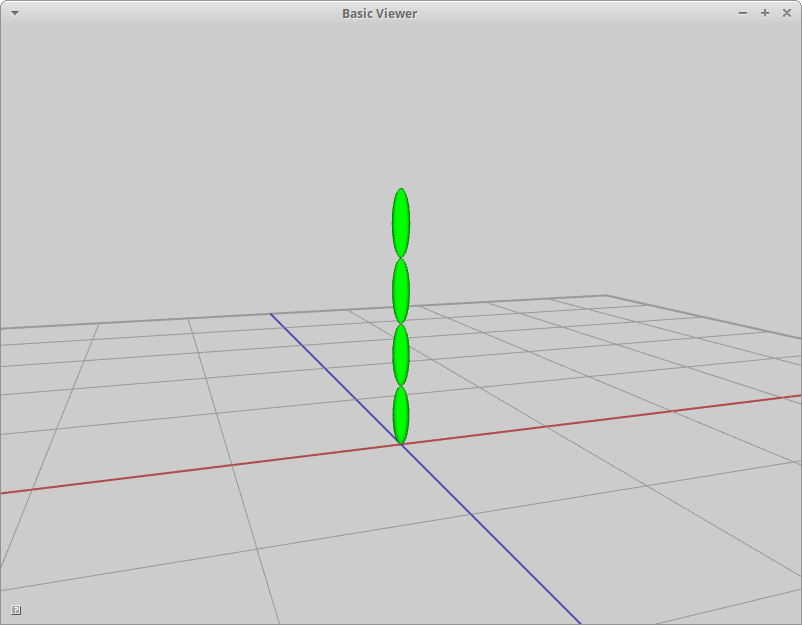
4.1. Skeleton
In this demo, we will define a tentacle character and then draw it using the global positions of each joint.
void scene()
  for each joint
    if the joint is the root
       continue

    p1 = global position of the parent joint
    p2 = global position of the joint
    draw a limb between p1 and p2
Tips and requirements:
-
Your skeleton should have at least 5 joints (including the root)
-
Each joint is 50 units from its parent. To make this easier, let the offset of each joint from its parent by along the local X-axis.
4.2. Motion
Use sine to animate each joint of the tentacle.
-
Rotate each joint around its local Z axis.
-
Use sine to compute the angle of rotation around each joint’s local Z axis.
-
Offset the angle of rotation for each joint to make the animation more interesting
5. Be Unique
Create and animate your own character (or characters) consisting of multiple body parts. Try setting keyframes or defining procedural motions using functions like sine or the rose curves. Feel free to also add particle effects for extra flare!
6. Hand-in your work
6.1. What to hand-in
-
Your code
-
Images, movies, gifs, as appropriate
-
Your readme
6.2. How to hand-in
Check-in your code, images, and writeup and push the changes to Github. If everything is uploaded correctly, you will see your work on Github.
> cd animation-toolkit
> git add <files>
> git commit -m "helpful message"
> git push
Best practice is to always commit changes as you work, rather than waiting until the end to commit changes. You can always revert to an old version if you need to!
Your code should download and compile without modifications. Test your assignment on a lab machine (Park 230) to ensure that it works.
6.3. Generating images, movies and gifs
Screenshots
On Ubuntu, you can take a screenshot by
-
Prt Scrn to take a screenshot of the desktop.
-
Alt + Prt Scrn to take a screenshot of a window.
Gifs
On Ubuntu, you can use Peek to create gifs.
Movies
On Ubuntu, you can use recordmydesktop to record movies in .ogv format.
By default, the whole desktop is recorded unless you give it a window id.
To get the window id, call xwininfo and click on the window. Then pass the
id to recordmydesktop.
> recordmydesktop --windowid <WindowId> --no-sound --v_quality 30 -o <name>.ogvTo check the video, open it in firefox.
> firefox <name>.ogv| Files larger than 100 MB cannot be checked into git. In general, videos should be less than 5 MB. |
6.4. Update your Readme.md
Update assignments/a6-transform/Readme.md to document the features in your assignment. Your readme should contain your images, gifs, and movies.
On github, you can drag and drop movies into your readme files. Images and gifs can also be added that way, or by including text such as the following
This Guide can help you with writing markdown.